Showing posts with label home. Show all posts

Bathroom Update

Tuesday, March 5, 2013

Ok time for a quick little bathroom update...

Last time we talked we had just gutted the entire bathroom and it went
from this... to this....


For more before pics and all the gory details check here! 

So an eternity (or maybe just a month) has gone by now and we have made "some progress".
I am a little impatient... can you tell? 
We checked lots of BIG things off of our to-do list and I feel like we are finally in the home stretch. I am so excited to get started on all the fun details! I am hoping to be back next week with the final reveal! 
Stay tuned!!!

Our bathroom now looks like this.
Yup!!! I'm pretty sure the bathtub is currently serving the purpose of a trash can! 

Don't mind the white goo in the tile cracks...
 that's the grout sealer and I snapped these photos before it was dry. 


New lights. New exhaust fan. Fresh Paint (and stripes... woohoo).
New Floors- my favorite part! I grouted them all by myself!!!! New window. 

All the trim and and baseboards will be finished tomorrow and ready for a coat of paint. 
Then it's time to make her pretty!!! 


Bathroom To-Do List:
1. rip out the old flooring
2. remove the old vanity, counter-top, medicine cabinet, and light fixture
3. HVAC- move the heat vent off of the floor
4.  Plumbing- change out some water lines, and move some pipes (I think), raise the toilet drain, etc. 
5. replace the existing window with a new one
6. replace the exhaust fan and add some recessed lights and an extra receptacle
7. fix the drywall 
8. paint the ceiling and walls
9. install the new flooring- ceramic tile planks
10. new window and door trim and baseboards
11. install new vanity, mirror, and toilet- already purchased just needs to be installed
12. Closet-???? get rid of it? change it???? this is TBD...
Decision: No more pesky closet door! I sure hope this decision works out:)
13. DECORATE- new shower curtain, window treatment, towel holders, other pretty stuff:)


share this on::
Facebook
Twitter
Pinterest
Digg
37 Comments »
Pin It!

The Big Picture

Saturday, February 23, 2013


Yesterday my son turned 6 YEARS OLD!!! What??? I know it's crazy, right? I still can't believe it!!
In typical "Boozer Family tradition" he spent the night before out on a date with Daddy! 
They shopped for his birthday gift and then went out to dinner! They both had such a fun night! 
Since Dave took him out I wanted to do something special for him myself. 


A friend of ours took this picture of my boys a few years ago during one of my husband's hockey games. It has always been one of my absolute favorites!!!


 Jonathon's bedroom desperately needs repainted but since we have SO MANY other projects going on  right now, it may be awhile until I get to it. 
Doesn't mean I can't do something fun to dress up such a blah room, right?

Jonathon's Bedroom Before
So here is the big picture :)
To get started I ran out and got all of my supplies! 
First thing I needed was the large print of the photo. I ordered it from Staples website. It is called an Engineer Print and comes in a few different sizes, but this one, 4ft. x 3ft.is the largest. It can only be printed in black and white and costs only $7.49!!! Woohooo!!!! 

Then I ran to the Home Depot and got a 4'x8' sheet of tempered hardboard for $8.97. A piece of underlayment or thin plywood would have worked too but was much more expensive and not nearly as smooth! What I got worked PERFECTLY!!! 


I had the nice lady at the Home Depot cut the board down to 2'9" x 3'9" so the picture would have a 3" overhang. I also grabbed some spray adhesive while I was there. Make sure whatever adhesive you grab is photo safe or one that won't ruin the print. I purchased this 3M kind. It was actually the cheapest one they had, at $5.44, but also the only one that said "picture safe"... can't beat that! While your out you should also grab a 10 foot long 1x2" or 1x3".  I had these at home so I didn't need to pick them up.

To get started I cut down my scrap 1x2"  into four pieces. I cut two longer pieces, 2 ft. 5inches, one for the top and one for the bottom, and 2 shorter pieces, approximately 2 ft long, for the middle. I attached the 1x2s to the hardboard with small nails.


We then used some screws and wire to create a "hanger" for the picture. I wanted something that would be VERY secure since the photo will be hanging over Jonathon's bed.  We secured the wire onto the top middle board. We drove the screws into the ends, wrapped them with the wire, and tightened the screw to secure it. 


Once we had the back all set up, we put some newspaper down on the floor and gave the whole board a good coat of the spray adhesive. That stuff is crazy sticky and it really doesn't take much to get the job done.
I really don't recommend doing this step inside. We were working in my Mom's kitchen because it was raining outside and it's so cold here that even the garage was freezing but even with the newspaper down, the floor still got a little sticky.


Once the board was sprayed my Mom and I each took a side of the paper and held it tight. She started by lining up the top where we wanted it, and laying it down on the board, while I held my end up form the sticky stuff. :)  


She then started smoothing the picture down very slowly from the top to the bottom. Once the paper touches the glue you only have a few seconds to pull it up and fix any mistakes. We were both SUPER excited about how easy the picture went onto the board. It was way easier then both of us had anticipated! 


And it looked awesome once we had the whole paper on! 


Then we needed to work on the edges. I chose to wrap the paper around the hardboard like you would wrap a present. We stood the picture up and creased the edges of the picture where it should fold around the board. I then sprayed the adhesive while my Mom folded the edges over. 
If you get ANY glue on your hands take a break and wash them before touching the picture. We were lucky to have two sets of hands so one could spray and one could fold over the picture. 


And then you are finished!!! :) Go ahead... pat yourself on the back!!! 


It turned out so much better then I had even imagined!!!
 I absolutely LOVE it!!! and more importantly, so does Jonathon!!! 


Special thanks to my beautiful niece, Sierra, for taking all the photos for me!!! 
(she made me say that:) 


share this on::
Facebook
Twitter
Pinterest
Digg
1 Comment »
Pin It!

Stick a Fork In It

Monday, February 18, 2013


So I have been drooling over these giant forks and spoons for like a year now! Aren't they AWESOME?
This first set (below) is from Pottery Barn and cost $169.00 for the pair.

(source) 

Then this gorgeous set is from Pier 1 Imports. The fork and spoon are $69.95 EACH. 


Eeeekkkk!
I seriously LOVE both of them, but lets face it, my wallet just isn't that deep! So you can imagine how super excited I was when I found these little beauties in a "junk bin" at the local Goodwill!!! 
AHHHHH... I might have shed a tear or two:) 


And at $1.97 each I kind of had to pinch myself. 
I knew exactly where I wanted to hang them. 
Right there...beside my BRAND NEW sliding doors <3 
(more on those later)


Aren't they AWESOME?


I love love love love love the way they look!!!!! 
I don't think I could get enough of them! 


I'm definitely that girl that is always jealous of everyone else's thrift store goodies... always whining about how I NEVER find anything at the Goodwill.... wah wah wah :(
I promise I will never complain about my Goodwill luck again! Pinkie Swear!!!! 

share this on::
Facebook
Twitter
Pinterest
Digg
7 Comments »
Pin It!

My Big Girl is 4!!!! New Bed!

Monday, January 14, 2013


Okay, so I have to admit... I have been slacking a bit on the blog. I fell behind on making my Christmas gifts, then was busy over the holidays, and after that the whole family ended up sick for a few weeks, so I am slowly starting to get caught up! Anyway I realized over my "holiday break" that I never mentioned on the blog that my sweet little Bella turned 4 years old on November 14!
 Isn't she a princess? Gorgeous, right??? She gets it from her Mommy:) 

This year she was very "anti- birthday party" which is pretty rare for her!!! She loves being the center of attention:) We had a pretty rough couple of months after my dad passed away and I think Bella was really just needing a little break in the chaos. We let her pick what she wanted to do for her special day and her choice, of course, was a date with her Daddy:) So he decided to take her to the Build-A-Bear Workshop.


Oh and of course she had to wear a "fancy" dress (and heels-which sadly you can't see in this photo). After building her very own stuffed bunny, Daddy let her pick what she wanted to do for dinner. Her choice was a steak dinner! Love that girl:)

New Books... YAY!!!!


We also had my Mom, and niece and nephew, over for cake and ice cream in the evening. Nothing to fancy, but Bella couldn't have been more excited! and totally loved all her new goodies!!!
 She is such a sweetheart! 

So she is the BIG 4 now!!!! and it seemed liked the perfect time for a MUCH needed new bed!!!! Up until now Bella had only slept in her crib and then her toddler bed. She is VERY tall for her age and has been ready for an upgrade for quite some time. Here are a few "before" shots of Bella's room. It is very SMALL and has absolutely NO storage! It has been in need of a makeover for some time, so the bed was the BEST place to start. 


Very Special thanks to Grandma (my mama) for Bella's gorgeous new bed! We found it here on Amazon. It arrived pretty quickly and we  my mom got to work right away on putting it together...with a little help from her beautiful helper! It took about an hour and a half to assemble. I was actually surprised at how easy it was. I couldn't be more happy with the quality of the bed and the extra storage is awesome! 


I have some MAJOR plans for Bella's new big girl room  (starting with some bedding) and I can't wait to get started! I promise to be back soon with an update:) 


share this on::
Facebook
Twitter
Pinterest
Digg
5 Comments »
Pin It!

Coat Closet Transformation

Friday, June 29, 2012

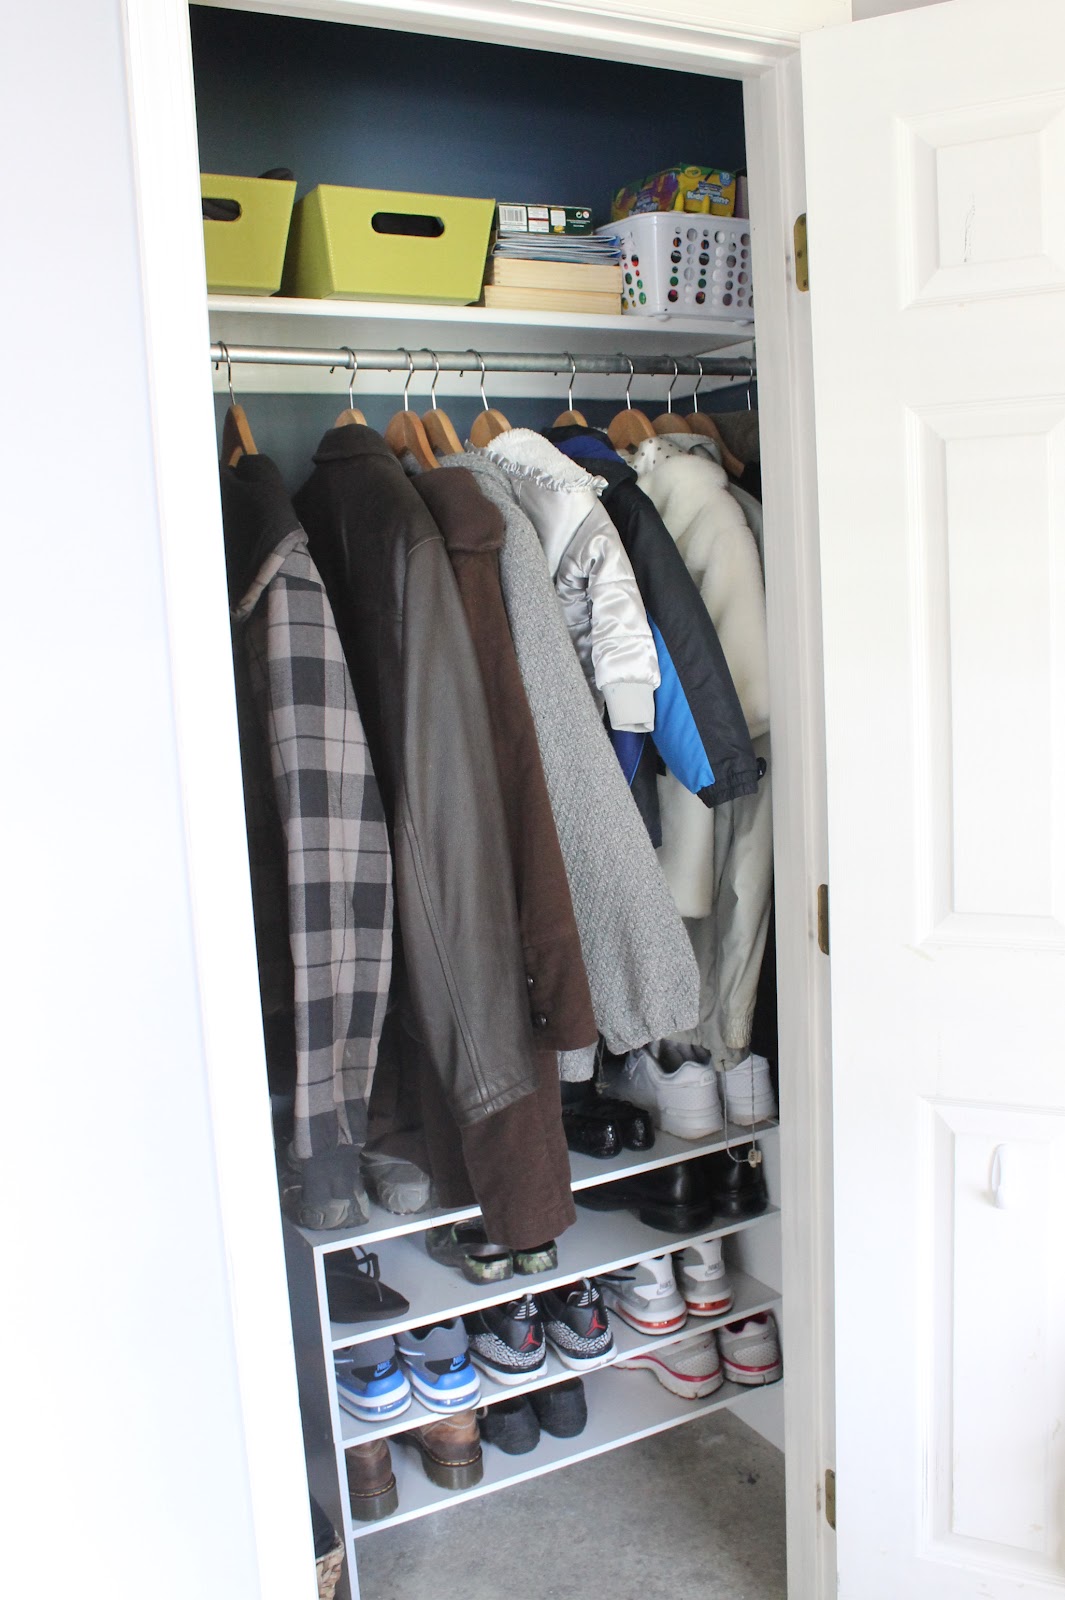
So last time the hubby was away on a little mini vacation with some of his buddies, I decided to go ahead and "fix up" our coat closet. There wasn't anything really wrong with the coat closet necessarily it just wasn't as functional as I had wanted it to be... I mean seriously, look at this disaster. There was no organization to the space so everything that we found just lying around the house ended up getting thrown in there. It was a mess!!!!  


i can't believe i'm even showing you this picture
The plan was to take the shelf which was hanging above the coat rod and move it up about 6 inches. Then I wanted to move up the rod itself and add some shoe storage underneath. Sounds simple enough, right?

Well as soon as the hubs left I got started... I took down the "shelf" which was really just a piece of wood sitting on top of some baseboards that were nailed to the wall. Then I wanted to take down the baseboards so I could move them up to raise the shelf. This is where my nightmare began... When I was taking down the baseboards I ended up pushing several holes in the drywall and cracking the boards themselves in several spots.


look at these cuties:) sorry for the panty shot!!!


Once I finally got the baseboards removed from the wall I knew I had to get started patching the drywall. UGH!!! All I have to say is I am definitely not going into the drywall business ever in my lifetime. It was horrible. No matter how many times I put on another layer, or how many times I sanded it I couldn't get it to be smooth or flush with the walls. Eventually I gave up and went ahead and painted the walls. My theory was it was just the inside of the closet and our coats would cover it anyway:)

So in the end, I repainted the closet, moved up the shelves and the rod, added some baskets and a shoe organizer, and even added some hooks on the inside of the door for the kiddos backpacks. I also got a ton of matching wooden hangers from a friend of mine! (who doesn't LOVE free stuff)  I don't think I would call it a masterpiece, but hey at least I can find things in there now:)


There is one more thing on my Coat Closet To-Do List but I'm not sure the hubby would go for it... I would LOVE love LOVE love LOVE to add a new door to the closet, just like this one here that I found on pinterest. :) Every time I look at it my heart goes pitter patter:)

share this on::
Facebook
Twitter
Pinterest
Digg
Add a comment »
Pin It!

Timberrrrrrrr

Wednesday, June 20, 2012


So you have heard me whine on here before about the "not so nice" Hurricane Irene and our random October snow storm and how it did so much damage to our property...Well, we are finally making some progress!!! It's costing a small fortune and my kids may not be able to eat this week, but at least it's finally getting done!

We used to have two big beautiful shade trees on our property but after the storms they were both destroyed. The photo below was one of those shade trees. It fell and we cut it up and hauled it away, but since we didn't have the stump grinded/ ground up -however you say it:) it kept sprouting from the roots in the ground, resulting in this big bushy looking mess.
The second shade tree was still going strong when we got a freak snow storm in October. Since the leaves were only beginnng to change colors and were all still on the tree, when all the snow and ice came the tree just couldn't hold the weight and the entire center snapped:(


and NOW...


 This tree or Yew bush- that's what the tree guy called it, wasn't damaged by the storm but it's in the weirdest spot. It's growing up the side of the house and it is smushed between the house and our big maple tree!


and NOW...


Eeekkk... I definitely need to get out there and pressure wash that siding:(
I don't even know where to begin with this mess. I'm not sure what the tree is on the corner, but my kids refer to it as the "spider tree" because it is always covered with spider webs and spiders. It's very picky and to be honest I'm getting tired of crawling behind it to get the balls when they get hit back there. The other bushes are lilac bushes and they look hideous. While I totally LOVE lilacs, these bushes were not planted properly. They are so close to the house that they grow weird and lots of the limbs are dying.


and NOW...


Last but certainly not least... the big hoohaaa of the show! These bushes/trees that lined our property are about 16 feet tall and there is a TON of them. You can see in the pictures that our property has a ton of open space behind it for parking for the ball field and the baseball field itself so there really isn't much blocking the wind. These trees have taken a beating from storm after storm. You can tell the previous owners used stakes and rope and tried tying them up together, but with no such luck. After all of the big weather events of last year these trees were almost all laying over on each other,
so they had to go:)


and NOW...


I am super excited about the progress we have made in the yard... but I know there is still A LOT more to do... after all we haven't even touched the front yard:)

Our Back Yard to Do List:
Clean up the tree grinding
Plant some new trees and bushes
Put up a fence
New House Deck and Pool Deck- we are hoping to take them both down and build one large deck combining the two.
Take down the damaged swingset
Add a fire pit where the one tree was grinded
Refinish the glider in the yard
Take out the clothes line poles
Fix up the quoit pits
Add some kind of storage for our trash cans

Ugh the joys of owning a home... oh well...our work is never done:) One day at a time!


share this on::
Facebook
Twitter
Pinterest
Digg
1 Comment »
Pin It!
 
Pin It button on image hover